
In this guide, I will show you the 3 things you should know when using PeopleSoft Query Security to secure your Queries.
- Query Access Group Trees
- Query Profiles
- Row-level Security using Query Security Record
Query access group trees help limit user access to tables, while Row-level security restricts access to specific rows within those tables.
Query profiles can be used to prevent users from performing certain operations like creating a Role Query, Run to Excel etc.
Before we go any further, remember that not all of your users would need access to Query.
So you can always restrict their access to the Query Manager, Query Viewer and Schedule Queries components using Permission Lists just like you would do with any other Component.
Now let’s get into the details.
Query Access Group Trees
Query Access Group Trees provide you with a tree structure to add Records to.
You then give users access to one or more branches using Permission Lists.
This will decide if the user has access to query a record.
Now, PeopleSoft provides sample trees with all applications but I don’t add new custom records onto these as these may get overwritten during an upgrade.
So I recommend that you don’t do this either.
Instead, create a set of new trees based on what your organisation needs.
Some use one tree per module while others use a single tree with one access group per module.
Rather than having one large tree for all your records, having one tree per module would be more manageable.
You can still use the delivered sample trees for all standard PeopleSoft records.
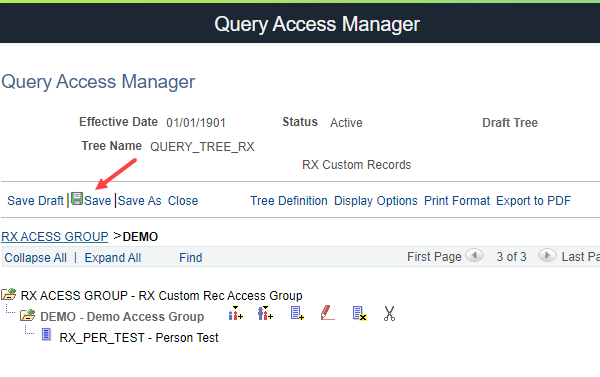
PeopleSoft Query Trees are built and edited using Query Access Manager.
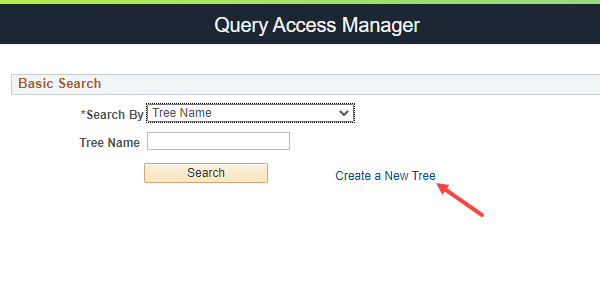
How to create a Query Tree in PeopleSoft?
#1 Navigate to PeopleTools > Security > Query Security > Query Access Manager and hit the Create a New Tree link.
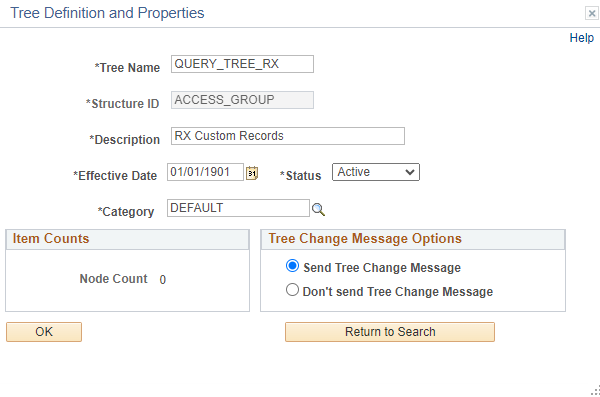
#2 In the pop-up that appears, enter the definition and properties including the Tree Name.
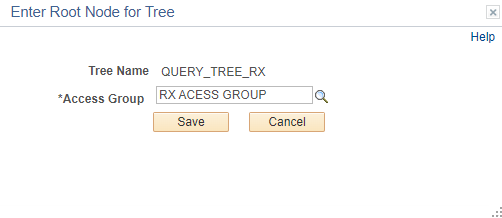
#3 In the next pop-up, let’s create the Root Acess Group by entering its name.
A handy tip is to have one Access group that includes all components of the tree. This would make it easier to assign permissions on the Access Groups tab in Query Security.
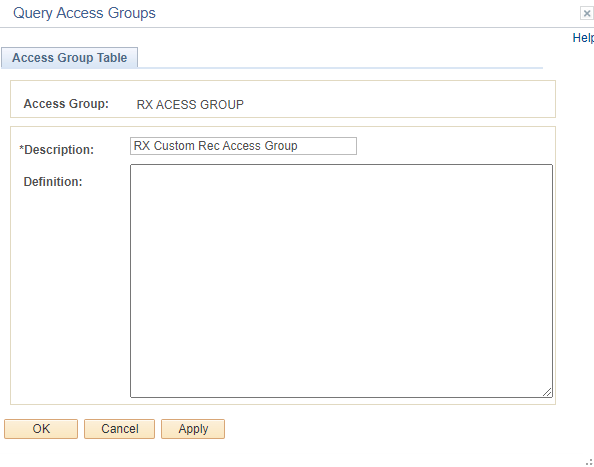
#4 In the next pop-up, enter the details of the Root Access Group.
Query Access Group Trees Contain 2 kinds of nodes
Access Groups – can have child Access Groups or Records
Records – these are your record definitions
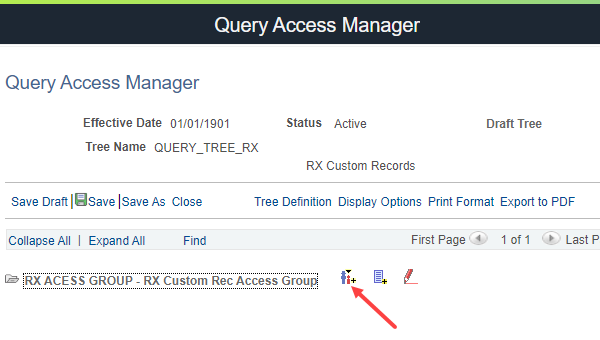
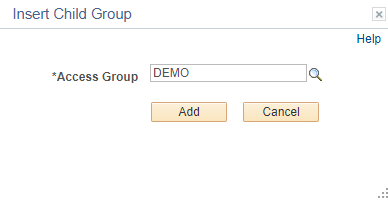
#5 Let’s insert a child Access Group called DEMO.
For this hit the “Insert Child Group” button and enter DEMO in the Insert Child Group pop-up.
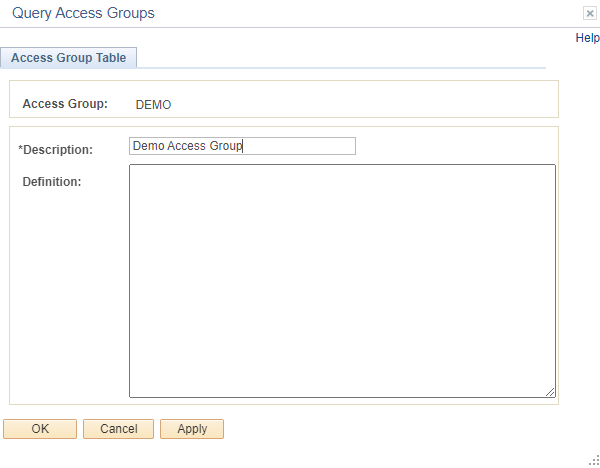
#6 In the next pop-up, enter the details of the DEMO Access Group.
#7 Now to add a Record under the DEMO Access Group, click the “Inset Child Record” button next to the DEMO group.
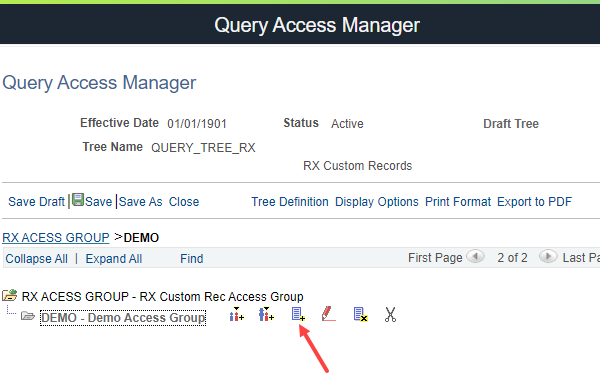
#8 Enter the Record name in the Insert Child Record pop-up.

#9 Save the Tree.
Granting Access using Permission Lists
Each Permission List can be granted access to one or more Query Access Groups.
To do this, navigate to the Query page of the Permission Lists component and click on the Access Group Permissions link.
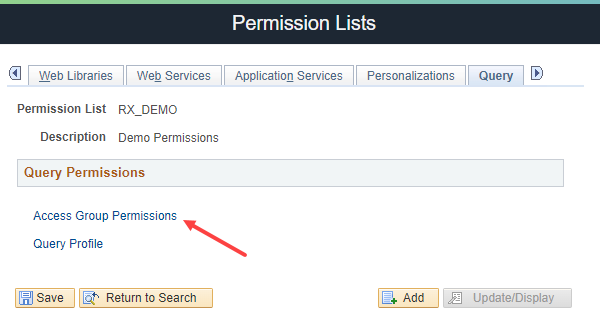
In the pop-up that opens, enter the Tree name, the Access Group name and check the Accessible checkbox.

Now, any user assigned this PL through a Role will be able to query all records within the “RX ACCESS GROUP” access group of the “QUERY_TREE_RX” Query Tree.
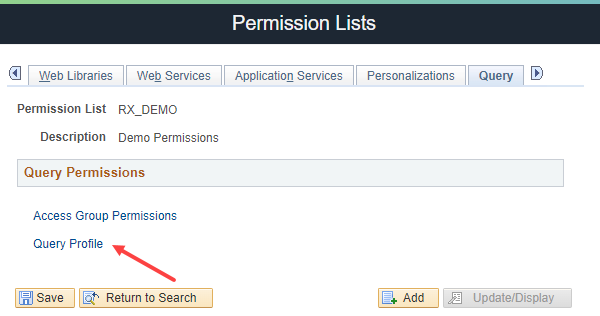
Query Profiles
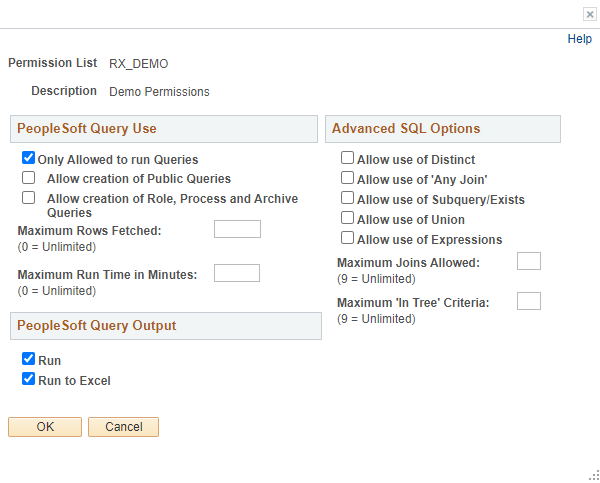
Query Profiles allows you to control how a user can use PeopleSoft Query.
For example, you may want to limit the number of joins that certain users are allowed to make or limit certain users from creating new queries. All these can be done on the Query Profile.
Query Profiles are attached to each Permission List and can be accessed from the Query page of the Permission Lists component.
Row-level Security
Usually, when a user has access to query a record, they can retrieve all the data within that record.
However, in some cases, you may have to restrict certain users from accessing some of this data.
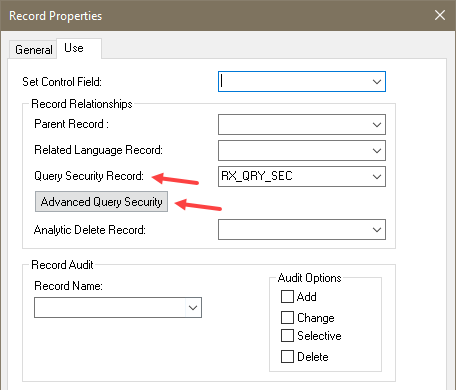
This is called row-level security and is enforced using a Query Security Record for Queries. It is similar to how you use a Search Record to restrict data in Components.
Query Security Records are added on the Record Properties dialog. By clicking the “Advanced Query Security” button, you can add up to five more Query Security Records.
How to create a Query Security Record?
Create a view that has all the keys of the record you want to secure.
Then add one of the following fields as a key but not a list box item.
For securing using User IDs, use OPRID
For securing using Primary Permission Lists, use OPRCLASS
For securing using Row Security Permission Lists, use ROWSECCLASS.
Once you have this record, use it as the Query Security Record in the Record Properties dialog.
Let’s take an example and see how Query Security in PeopleSoft works.
Let’s secure the record RX_PER_TEST
It has EMPLID as the only key.

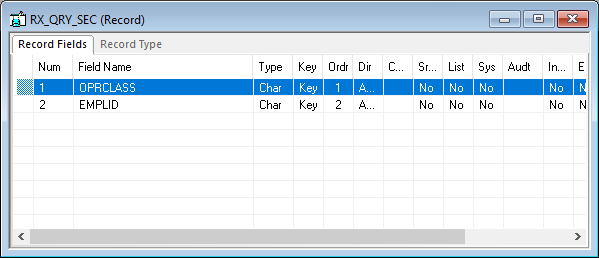
So when we build a Query Security Record for RX_PER_TEST, it should have EMPLID as a key.
In addition, it should have either OPRID, OPRCLASS or ROWSECCLASS as a key.
Let’s secure it using the Primary Permission List. To do this we will have to add OPRCLASS as a key.
So the security record will have OPRCLASS as a key and not a list box item.
And EMPLID as a second key.
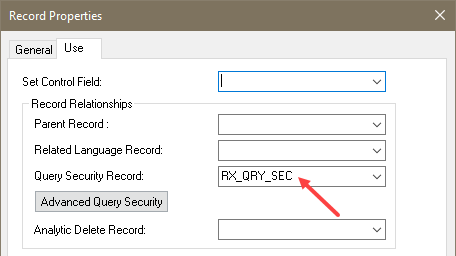
Let’s call our security record RX_QRY_SEC.
Now let’s add this security record to the record properties and see how it behaves in Query Manager.
Now, when we do a select on RX_PER_TEST, Query Manager automatically adds a join to RX_QRY_SEC as it is listed as the Query Security Record. And since RX_QRY_SEC has OPRCLASS as a key, PeopleTools automatically adds a condition to the WHERE clause equating it to the user’s Primary Permission List.
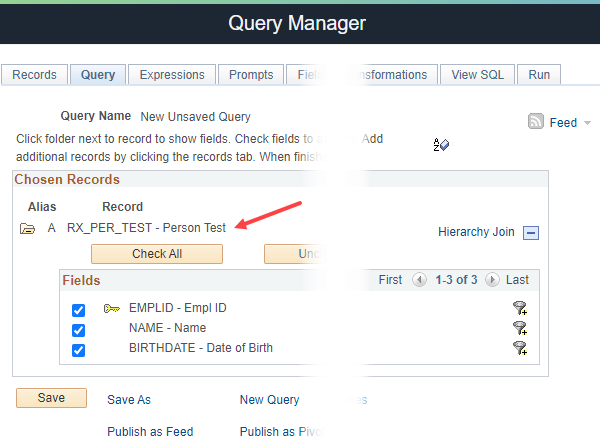
So the generated for the Query will look like this.
SELECT A.EMPLID, A.NAME, TO_CHAR(A.BIRTHDATE,'YYYY-MM-DD') FROM PS_RX_PER_TEST A, PS_RX_QRY_SEC A1 WHERE ( A.EMPLID = A1.EMPLID AND A1.OPRCLASS = 'HCPPALL') |
Something to keep in mind is that this automatic joining doesn’t happen for Process queries. So it is important not to grant access to create Process Queries to users who don’t need it. This can be done through Query Profiles.
Why is a record now showing in PeopleSoft Query Manager?
There could be several things at play here. Follow these checks to troubleshoot the problem.
#1 Has the Record been added to a Query Security Tree?
#2 Has the user got access to the Query Tree / Access Group under which the record is added?
#3 If the Query Access List Cache is enabled, has the PSQRYACCLIST process been run?
How to add a record to Query Tree in PeopleSoft?
Navigate to the Query Access Manager and open the Query Tree you want the record to be added to.
PeopleTools > Security > Query Security > Query Access Manager
Find the Access Group under which your record has to be added.
Click the “Insert Child Record” button which will bring up a pop-up window asking for the record name.
Enter the record name and click the “Add” button.
Save the Tree.
What is Query Access List Cache?
When you enable the Query Access List Cache and run the PSQRYACCLIST Application Engine Program, it populates the PSQRYACCLSTRECS record with the list of records that each Permission List is authorised to access. So PSQRYACCLSTRECS serves as a cache of Query Access List Records.
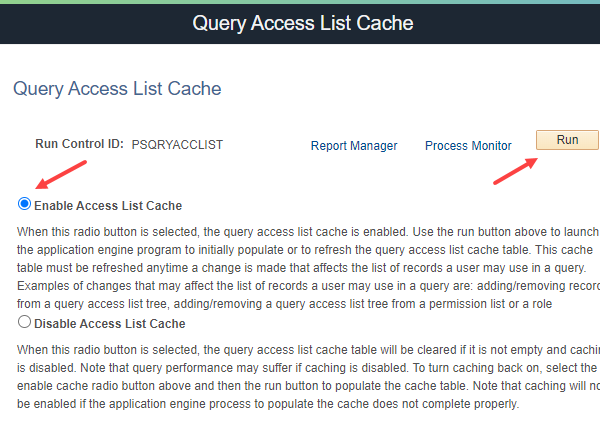
Why is my Query Access List Cache being disabled automatically?
Sometimes you will find that the Query Access List Cache is in the disabled state even when you know that you had enabled it.
When you make changes to a Role or a Permission List in a way that affects the Query Access List Cache, it gets disabled automatically. At this point, you must rerun the PSQRYACCLIST process.
What are the Query Security tables in PeopleSoft?
These are the important records that are specific to Query security.
PSTREEACCRECPVW – Query Access Group Tables Prompt
PS_SCRTY_ACC_GRP – Access Group Security
PSQRYACCLSTRECS – Query Access Record List
I have another post with the full list of Records used by PeopleSoft Query.
Are users unable to see a Query in Query Manager?
The first thing to check would be the Query Type. When a search is performed, this defaults to “User”. If the Query is of another type like Role or Process Query, then this could be the reason why it is not showing up in the results.
Another point to check would be the owner of the Query.
Is it a private Query that belongs to another user or is it a public one?
Private Queries belonging to other users would not show up in the search results.
Finally, if the Query contains at least one record that the user doesn’t have access to, the Query will not show up in the search results. The SQL provided under the next item will help you identify such records so that you can grant the user access to them.
How to find missing records using PeopleSoft Query tree SQL?
This SQL looks at all the records in the Query first.
It then uses a NOT EXISTS to find records that are not assigned to any of the Permission Lists that the user has access to.
SELECT DISTINCT RECNAME FROM PSQRYRECORD A WHERE QRYNAME = '<your query name>' AND NOT EXISTS (SELECT 'X' FROM PSQRYACCLSTRECS B, PSROLEUSER C, PSROLECLASS D WHERE B.RECNAME = A.RECNAME AND B.CLASSID = D.CLASSID AND C.ROLENAME = D.ROLENAME AND C.roleuser = '<your oprid>' ); |
Conclusion
PeopleSoft Queries can be secured using Query Access Group Trees, Query Profiles and Security using Query Security Records.
You can also not give users access to the Query Manager, Query Viewer and Schedule Queries components.
Remember that securing queries is not a one-time activity. You will have to review these periodically to ensure that it is in line with your organisation’s requirements.